Introduction - Part 1: Get familiar with the Product
What is the overlap needed for Pix4D to process imagery?
The recommended overlap used in Pix4D is 75%
What if the user is flying over sand/snow, or uniform fields?
When working with ununiform surfaces, it is recommended the overall overlap of images should be increased: minimal 85% frontal and 70% lateral.
What is Rapid Check?
Rapid Check reduces the resolution of the images used in a project from their original pixelation to 1MP. As a result, operations can be run faster but as a result produces lower global accuracy because there are less overlapping pixels which can be match to one another because there are now less pixels per image. This often done to check the overall quality of the data consumed by the device.
Can Pix4D process multiple flights? What does the pilot need to maintain if so?
Pix4D can processed datasets composed of multiple flights provided that the total number of images is less then 2,000. Just as will the images from one dataset, when combining two sets from different flights there must be the appropriate amount of overlap between flight paths and images. figure 1 exemplifies the amount of overlapping flight area is necessary:
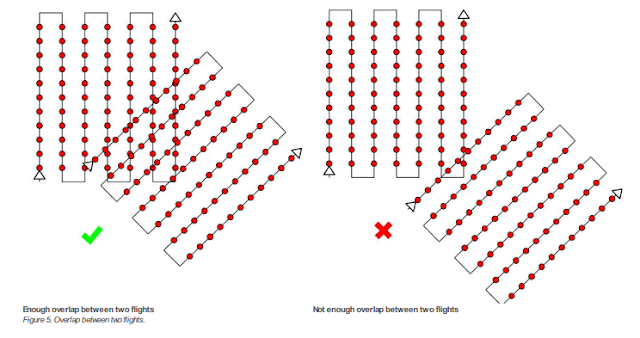 |
| figure 1: appropriate image acquisition plans for combining multiple datasets composed of more than 1 flight mission. |
Can Pix4D process oblique images? What type of data do you need if so?
Yes, Pix4D can process oblique imagery. To do so, two different flights need to be ran. One flight at a higher altitude, with a oblique angle of 30 degrees. The second flight needs to be at a lower height, with a camera angle around 45 degrees. This is able to create a point cloud, which is good for modeling buildings, but cannot create a complete orthomosaic.
Are GCPs necessary for Pix4D? When are they highly recommended?
The answer to this question depends upon the users application and how much accuracy is necessary to complete the task. If working a construction based project, accuracy is of high importance and GCPs need to be accurate to the centimeter or less. If the application is for agriculture purposes, GCP accuracy is not as important and need only be accurate on a meter scale.
What is the quality report?
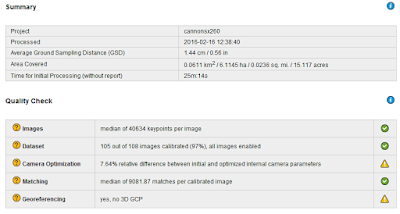
The quality report is a report that provides detail about the operation just conducted by providing a summary, quality check, and preview of what is being created. The summary is perhaps the most important because it tells you important information about your images like the amount of overlap produced and average ground sampling distances. figure 2 below shows the an example of a quality check
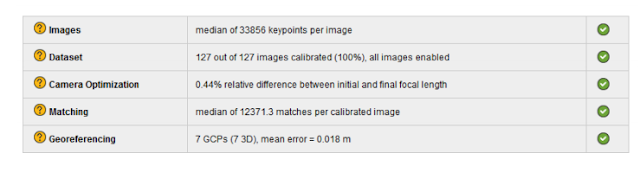 |
figure 2: Quality report check. Green checks mean that portion of the check has been passed.
|
Part 2: Methodology of Using the Pix4D Software
Initial set up and processing
In order to run a Pix4D project, there are sometimes several user inputs that need to be carefully attended to by the user. Some sensors have there metadata saved within the Pix4D program, like the Cannon SX290. If the sensor is not in the programs memory, like files coming from a GEMS sensor, the specifications about the camera must be input manualy into the software. Optionaly, this is also where you would enter into the software information about GCP positions
Along with camera specifications, some sensors, like the Cannon SX260, upload their images with their coordinates already attached to the file. Other sensors, like the GEMS, require that you assign a text or CSV file via a join to these images. In either case, once coordinates and camera specifications are established, Pix4D can now create run its initial processes.
Creation of 3D mesh, Point Cloud file, and Project Data
After initial processing, Pix4D begins to create files that will be apart of both the output and the creation of the DSMs and mosaics later on. First what is created is a 3D_mesh fiel, which stores 3D textured mesh in the formats selected by the user. After that, a densified point cloud is created in the format selected by the user. lastly, a file creating the project data is created. This file contains information need for the software to create run ceratin oppetaions correctly, and create summary reports relating to the project. The creation of these outputs, is all apart of the Point Cloud Densification process. A Point Clound Densifcation report is created upon the compleation of this processing event, and is made available as apart of the final Quality Report.
Within the report, the Point Clound Densifcation Details would look similar to what we see here in figure 2:
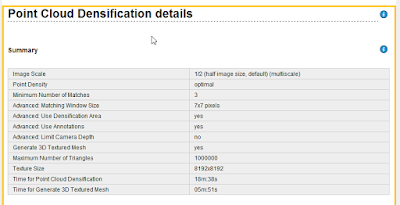 |
Figure 3: Point Cloud Densification Summary. Apart of the quality report.
|
DSM and Orthomosaic Creation
In this final process of creating the Pix4D project, the DSM and Orthomosiacs are created using the inputs of the user, data from the sensor, and files created in previous processessing opperations.
In a folder called 3_dsm_ortho, the following folders are made:
- 1_dsm: stores raster DSM and grid DSM in the format specified by the user
- 2_mosaics: Stores orthomosaic with transparency capabilities. If specified by user, tiles and map-box tiles are also stored here.
- extra information (optional): If specified by user, will create and store contour lines. Is not generated by default
Final Quality Report
Stored within the 1_initial folder, contained within the project file, a final quality report pertaining to the project will be produced and held. Within this report, Pix4D provides summary information about the quality of the project and how well the the software was able process the data from the sensors. The Report contains a number of figures, tables, and diagrams pertaining to how well the data was collaborated, mosaiced, and geo-referenced. The Report also contains all the saved information about what specific user inputs were applied to that specific project. Another helpful thing that accompanies the report, is a preview of of both the orthomosaic and DSM created by the project.
Reviewing Pix4D products from GEMs and Cannon SX260
Creating the projects, and the time assoicated with running the standard operations of Pix4D, took a long time. Each project took roughly 1.5 hours to complete, and some times the result was to poor to even use. This was only the case with the GEMs files that were using. After working with 2 datasets that were producing very lumpy data, it was clear that something was wrong with the data collected during those specific missions. After producing two projects with GEMS imagery that were unusable, a third dataset finally worked and the results were of a higher quality.
The Cannon SX260 project transpired very smoothly, with no need to attribute text or CSV files to provide coordinates for the images, the project produced good results on the first round of computation. For the GEMs imagery, a separate text file had to me applied to the imagery when creating the projects to provide a spatial attribute to each image. This file is created when exporting the imagery collected from the GEMS, into pix4D. So although there is an extra step in creating the project, the process is still very straight forward and simple. Below, in figure 4, we see what the GEMS data looks like prior to being processed, without ant attributed geolocation/orientation information
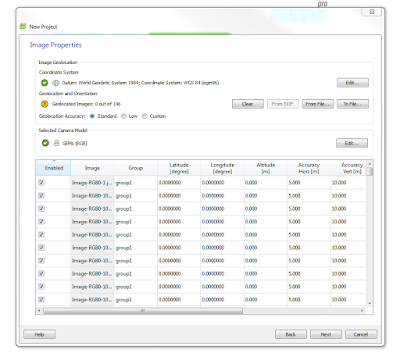 |
| figure 4: GEMS images before being assigned coordinates |
Such data, by itself, is useless to us. In line with the Geolocation and Orientation tag - is a button that says 'From File'. Clicking on that tab, one can select a CSV file that should be in the folder of the dataset created when the imagery was exported to Pix4D. That folder by default is labeled export, and contains a different CSV for each different set of imagery (Mono,RGB, NIR).
After selecting the appropriate table, the user must select the file format, which is essentially the order of geographic reference, as they are displayed in within the CSV file. because of this, the user should open the CSV file before assigning it to the images in Pix4D, so that they know what the format is, and don't end up entering the wrong order and population your images with incorrect spatial reference. Below, in figure 5, we see the correct locations for each image in terms of GCS lat - long.
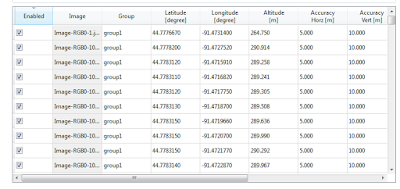 |
| figure 5: A portion of the geolocated images from a GEMS sensor |
Another thing that often times needs to input by the user, are the camera specifications. Some sensors, like the Cannon SX260, will populate these fields for the user as their imagery is uploaded. Other sensors, like the GEMS, do not feature this quality, and must be input manually. below in figure 6, is an example of the type of specifications required by the software to run a project.
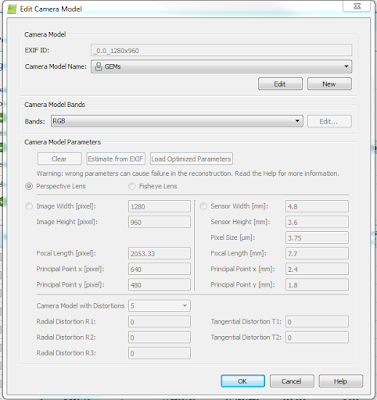 |
| figure 6: Camera inputs for Pix4D |
Reviewing and discussing the data with Quality Reports Created for GEMS and CannonSX260 projects in Pix4D.
Cannon SX260
 |
| figure 7: cannon SX260 summary |
Here in figure 7, above, one can view the SX260 specifications and the quality check conducted after the initial processing process of the Pix4D project creation. Of the 108 images input for this this project, 105 were able to be calibrated and used to create the orthomosaic and DSM. After examining the data in Pix4D, the area where there is no calibrated imagery is a wooded area of dispersed trees and other vegetation. This is likely the case because trees are very dynamic in their shape, trajectory, and pattern, and would thus be very poorly represented
The quality report also provides a diagram showing how much overlapping imagery there is throughout a mission. Figure 8, below, displays these areas.
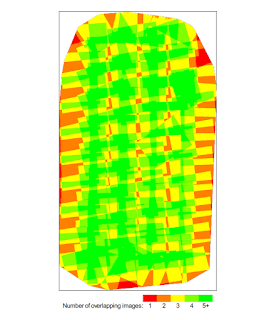 |
figure 8: amount of image overlap for cannon SX260
|
Referring back to figure 8, the areas with the lowest amount of overlap are at the bottom and to the right of the image. The low number of overlapping imagery was likely known before the mission, and was allowed because it was not of high importance to the grand scheme of the mission. Had the mission done one more pass over these given areas, the amount of overlap would be higher than what we currently can see.
GEMS
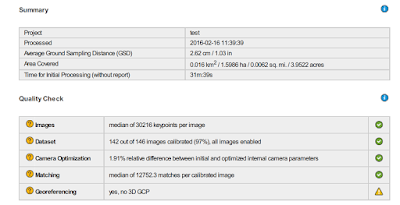 |
| figure 9: GEMS specs and quality check |
Here in figure 7, above, one can view the GEMS specifications and the quality check conducted after the initial processing process of the Pix4D project creation. Of the 146 images input for this this project, 142 were able to be calibrated and used to create the orthomosaic and DSM. After examining the data in Pix4D, the area where there is no calibrated imagery is a wooded area of dispersed trees and other vegetation. This is likely the case because trees are very dynamic in their shape, trajectory, and pattern, and would thus be very poorly represented.
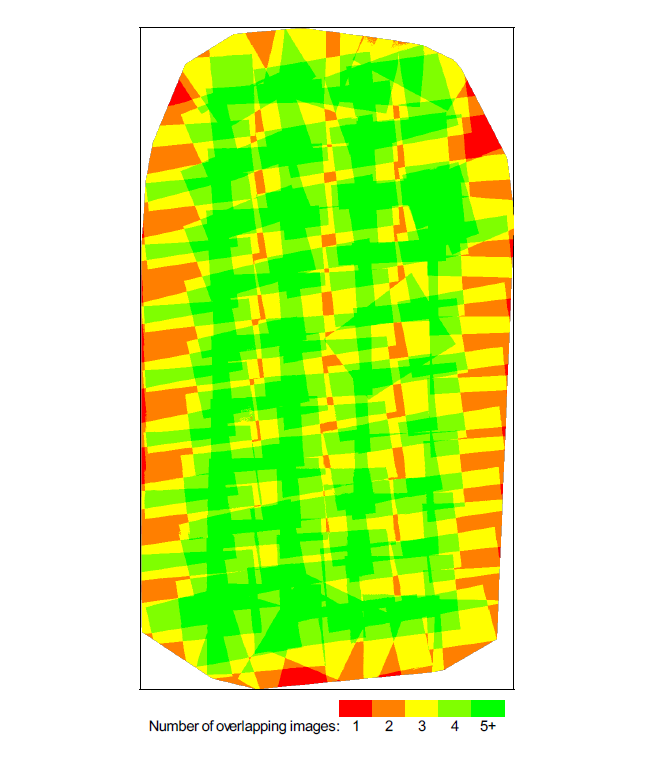
Relating those images that were not calibrated to wooded areas, let us observe the overlap diagram produced by the quality report for this project in figure 10 below.
Overall, there is a very high degree of overlap for almost the entire area. However, with that being said, there are are areas outside of the edges of the mosaic that have poor overlap. The areas being referred to are the right-central location and a the thin line that crosses the upper portion of the AOI. relating this to the orthomosiac produced, both these portions that resemble areas of poor overlap are forested areas, and are not represented in the final orthomosaic, they are blank spaces blotted through out that area.
Comparing the two projects, the GEMS mission has a much more dense level of overlap compared to that of the Cannon SX260 mission. This is not a comment on the sensors capability, but is refering too the difference in mission planning that likely took place. The area of interest for the GEMS mission is much more dynamic and changing, and thus would require more overlap to create an accurate orthomosaic and DSM.
Ray Cloud: Measuring Areas and Distances in Pix4D
The ray cloud tool utilizes the multiple angles and distances of the various images taken to provide accurate 3D areas and distances of user created polygons or lines. The key for this tool to be accurate, is having the same area as overlapped from different angles and distances as possible. Here are a few a measurement oppertations conducted using the data produced with the Cannon SX260. These measurement features were later exported to ArcMap, and are apart of the maps compiled later on in this lab assignment
Line Measurement
Line measurement is a helpful tool for both applying the software, and quality checking data. In this instance, the tool was used to measure a straight portion of a track which has a known length of 100 meters. Going from line to line, the results were as such:
Terrain 3d length: 100.60 M
Projected 2d lengh: 100.55 M
The discrepancy between the distance recorded and the actual distance of the track (100 M) is likely due to the distorted pix-elation that occurs at close levels when zoomed at high levels onto the track. Figure 7 shows what is meant by this with an example of the distortion.
 |
| figure 7: distortion of cannon SX260 point clouds in Pix4D |
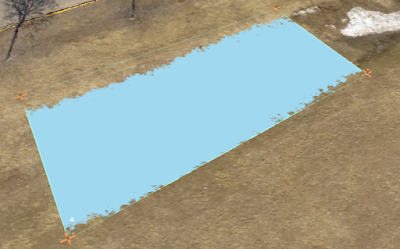
Area Measurement
Measuring the area of a given space is also a helpful tool made available through the rayCloud tool. After an area is created, a toolbar on the right shows the multiple angles the area created can be seen through the vantage point of the different images that have an overlapping viewing area of the same portion of the surface. Using these images, the user can subsequently alter the vertices of the polygon the polygon they created. Here are the specs of the area captured in the middle of the open field next to the track at South Middle School.
Enclose 3d area: 705.50 square meters
Projected 2D area: 656.72 square meters
Here is the area which was recorded and produced theses values.
 |
| figure 8: area captured using rayCloud in Pix4D |
Volume Measurement
The final thing that one can do using rayCloud is calculate interval volume measurements of areas or items that are apart of your surface. The volume value can either be positive or negative, indicating weather the the mass of the measured feature a divet in the surface or something that occupies space above the surface. Similar to what you can do with the vertices in area measurements, the user can also view the feature they created in all of the images that overlap that area of the surface, and can subsequently alter the vertices as they see fit. The area measured for this example was a drainage ditch-like divet between an open field and the parking lot. here is what this area looks like and its subsequent volumetric measurements.
Fill volume: -41.37 meters cubed (+/- 5.45)
Total volume: -40.94 meters cubed (+/- 5.85)
 |
| figure 9: volume area of a drainage ditch processed in Pix4D |
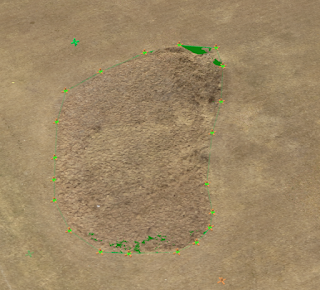
Final Maps
by exporting these maps to Arcmap, the files ore oriented and can me made into maps. Figure 10 and 11 below show the maps made from the GEMS and Cannon SX260, in that order.
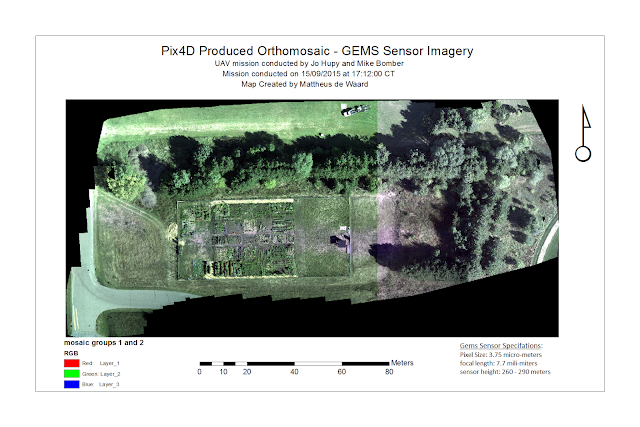 |
| figure 10: GEMS mosaic |
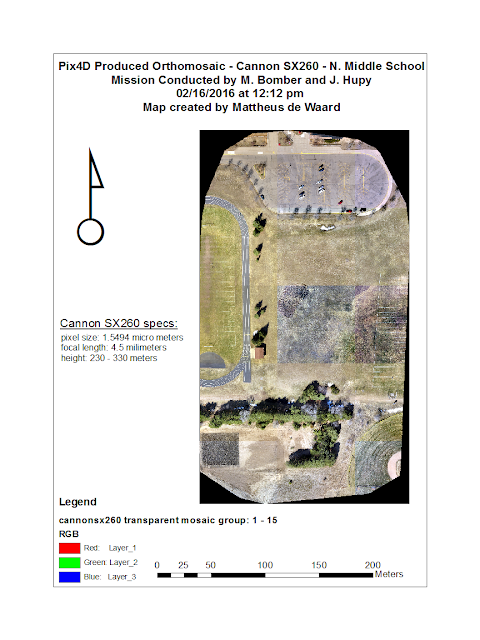 |
| Figure 11: Cannon SX260 mosaic |
Conclusion
Pix4D is a powerful software with very useful open source capabilities. Being able to upload imagery from a wide array of sensors and subsequently process the data within those images into a product that can be used for any number of applications across a wide range of various industry needs is what sets it apart from other software, like that of the GEMS, which we have already worked with. Software with GEMS, is only very useful when working with GEMS hardware. Pix4D, on the otherhand, may have a few more user inputs required to create meaningful results, but is a much better tool for someone who is more verse in remote sensing with imagery captured from a UAS. The results produced were of high quality, and most importantly, through using the software i was able to gain a better understanding of the technological nuances of creating orthomosaics and DSMs.